

A tutorial on how to solo mine on Windows.
Solo Mine Your Node
Solo mining is a great way to improve the Kaspa network’s decentralization while earning rewards, avoiding pool fees, and bypassing third parties. By solo mining, you have complete control over your mining process and can enjoy the full reward if you hit a block. With the upcoming release of Rusty-Kaspad and higher block-per-second throughput, solo mining will make even more sense for modest miners.
Before starting this tutorial, you need to have a synced Kaspad node. If you haven’t done so yet, please refer to the previous tutorial on how to set up a node: https://kaspacurrency.medium.com/48d1aee1c6d7
It is possible to solo mine regardless of your mining hashrate. However, even with a high hashrate, there is no guarantee that you will find a block, and you could go long periods without any rewards. With the network’s current difficulty, if you have a hashrate around 10–15 GHS or more, solo mining can be a viable option as you have a good chance of finding more than one block daily. This can be quite competitive with pool mining, as pools usually pay out rewards every 12 or 24 hours.
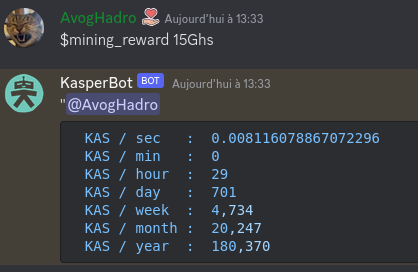
To estimate your expected rewards as a solo miner, you can go to Kaspa’s Discord server and type in the bot-command channel: “$mining_reward 15Ghs,” for example :
If you do not have any mining software installed, please refer to the previous tutorial (https://kaspacurrency.medium.com/877935f273f3), where I showed how to use Bzminer to mine to acc.pool
Compared to the previous tutorial, setting up the mining program for solo mining is as simple because there is usually an option for solo mining to your node. Here is an example using Bzminer for Windows again. The last lines of the Kaspa batch file are for solo mining to a node :

If your node is running on the same machine as the mining software, then you have to delete the “::” symbols and change “kaspa:0000” with your receiving address. The “solo+tcp://127.0.0.1:16110” option corresponds to where the miner will look to connect with the node. The IP “127.0.0.1” is for the local host, your machine. If this is the case, you have nothing else to change and can start the mining software.
Typically, you will have multiple rigs, and the node is hosted on one machine only. Then, you need to identify the IP of the machine hosting the node on your local network. In Windows, open a terminal prompt and type “ipconfig” Look for the line indicating the IPV4 address. Then, you can modify “solo+tcp://127.0.0.1:16110” by replacing “127.0.0.1” with the IP of your node.
Finally, Suppose you run the node on an external network. In that case, you have to open port number 16110 on the machine’s firewall hosting the node and router. How to do this depends on your network supplier/company and operating system. You also need to get your router’s remote/external IP by using this tool: https://www.yougetsignal.com/tools/open-ports/. Opening this port on your machine will make the node “public.” Other miners could connect to it if they know your node’s IP. You could also do the same to find a public node and mine to it, but that will make you rely on a third party whose node maintenance you are unsure of.
Tip: AvogHadro is a Community Helper in the Kaspa Discord. As an avid Kaspa supporter and crypto enthusiast, AvogHadro‘s knowledge and support is well respected and valued within the Kaspa Community.
Find me on the Kaspa Discord — Bubblegum Lightning